How to take pictures (learn the basics)
Learn how to take pictures that will make your friends jealous. This beginners guide will boost your photography skills by explaining six easy tricks. Learn more about the golden ratio, the influence of correct illumination, depth & composition and after effects.
How to take pictures (basics)
1. Golden ratio
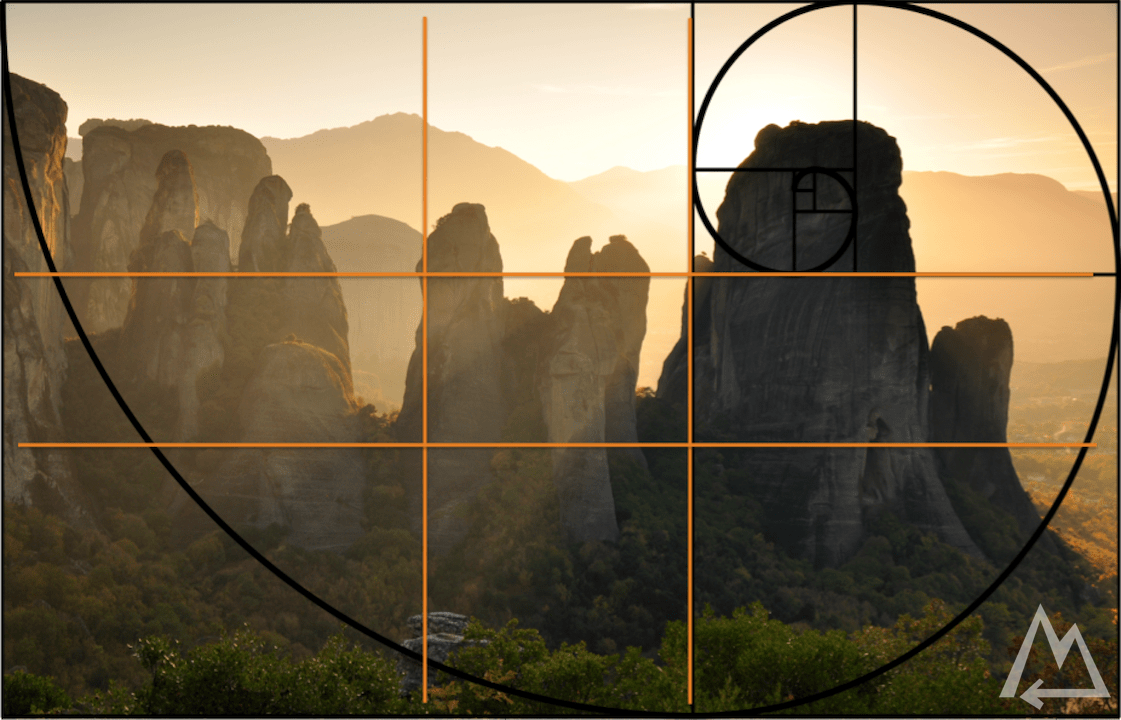
The golden ratio is an important tool to give your pictures the right harmony and eye-catching certain something. The important thing to know is that the golden ratio 1.618 that can be inverted to 0.618 which account for almost 2/3 of an image. Confused? Well that’s no problem you don’t actually need these numbers for taking pictures. Most cameras have a built-in grid in the viewer that is either exactly in the golden ratio or pretty close to it. If you don’t have any positioning aid in your camera then just try to position dominant objects into this pattern by eye.
Golden ratio & fibonacci spiral
The picture above shows an example of how to position a dominant object by using the golden ratio (dominant gaps in the hills) and bringing it one step further with positioning the big rock into the center of the fibonacci spiral. The golden ratio is the key factor defining the fibonacci spiral. There are thousands of examples in nature that follow the pattern of the fibonacci spiral, so why not use it in photography as well.
Tip: Most convenient, just go with the 1:1:1 rule. Position big objects / sharp edges somewhere at 2/3 of the view in both, vertical & horizontal direction. There is always something sticking out of the scenery that you can use to position your shot like a pro. If you want to go with the golden ratio, use the “phi-grid” in your camera settings.
2. Light
Shoot from the same direction as the light comes from. I know, it’s exactly the opposite to the example with the golden ratio above but in 99% of the cases you’ll get the best results. Key is to get as much light as possible into your lens. If you can’t avoid to shoot against the light use the high dynamic range (HDR) mode on your camera / smartphone. In this mode, the camera overlays several images with different exposure settings to get the dark areas in great colors too.
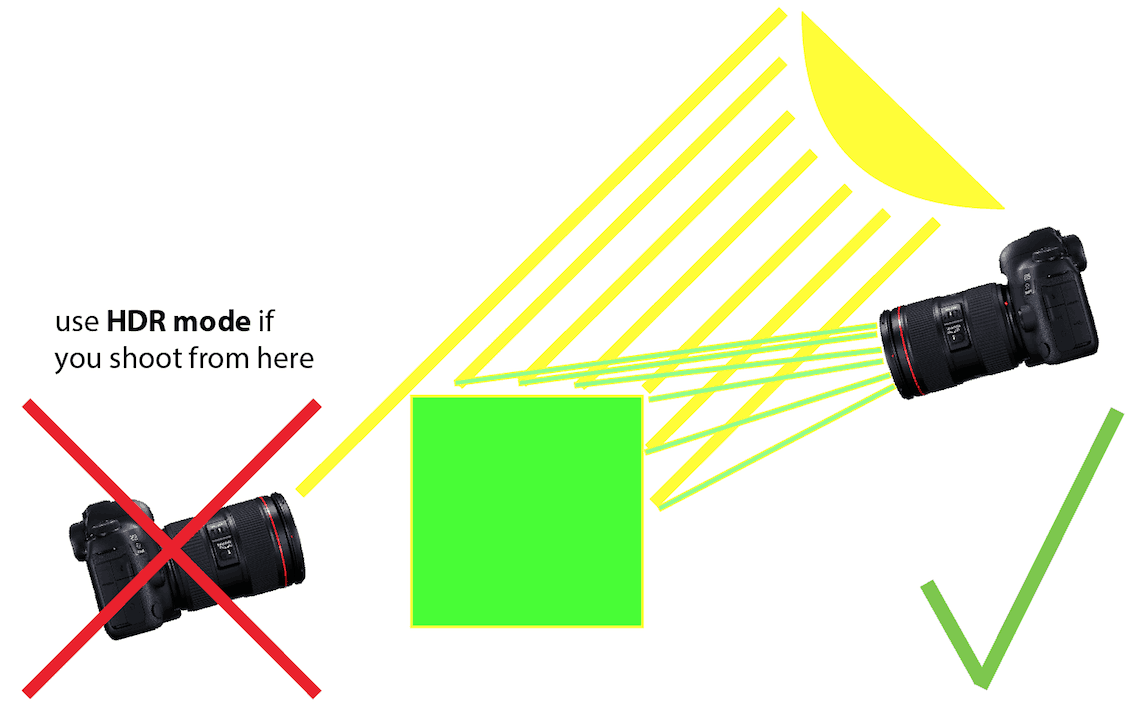
Correct light direction & HDR mode
Tip: You’ll get magic light effects at sunrise or sunset. In the early / late hours the light intensity is lower though but the color spectrum you’ll get is fantastic. Especially right before sunset when the so-called golden hour starts, you’ll get shots like in the golden ratio example. Change your camera settings to manual / expert mode and play around with exposure, ISO, shutter speed & white balance, learn more about these settings in our advanced course.
3. Clean lens
It might be obvious but too many times did I notice at the after effects stage that there was something on the lens. If it’s a fingerprint, dust or water drop it just sucks as the image is impaired. Especially if you go with the manual mode of your camera, invest some time to get a good shot, maybe even long exposed and finally notice that the lens was dirty, annoying. Therefore, I recommend to always use the lens hood and clean the lens from time to time. If I shoot with the smartphone, I check the lens for cleanliness as a routine, especially if it’s gonna be an important picture.
4. Composition & depth
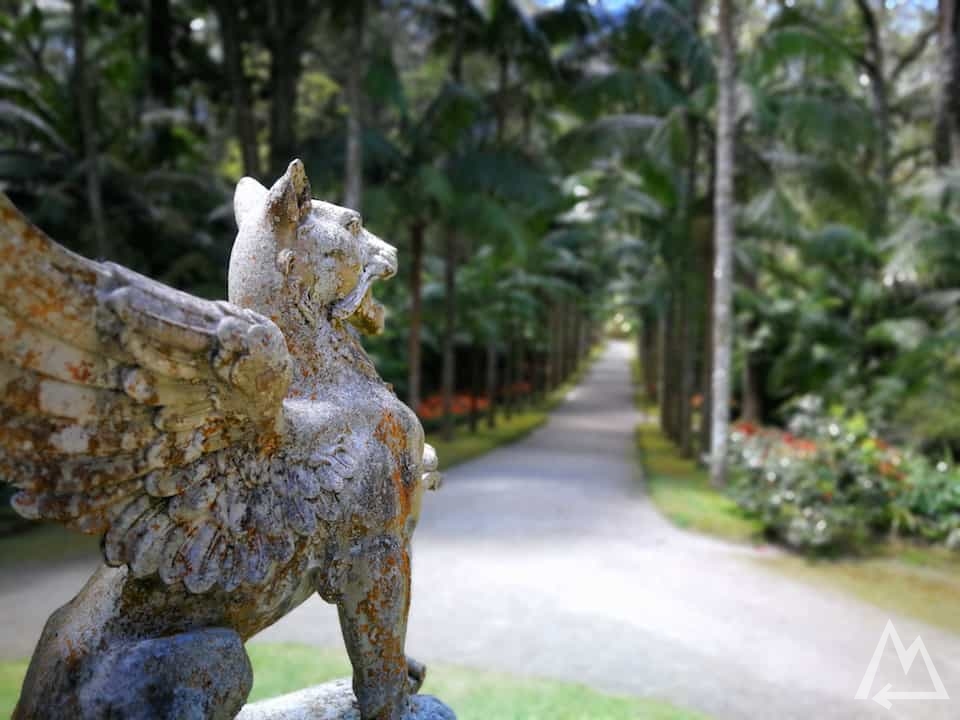
I recommend not to use the zoom function of a camera, especially if you only have digital zoom. Instead use the surrounding area as a defined part of your composition to give the picture more depth.

Composition & depth
Tip: Always try to combine the golden ratio, light and depth. The volcano and the bright green pine trees stick out of the scenery, put them into the golden ratios. Have the sun in your back and not zooming too much to the volcano results in a nice composition.
Another cool effect is the so-called Bokeh-effect which intentionally eliminates depth by blurring the area out of focus. Today’s smartphones with dual lenses use this technique by using the two different focal lengths of the dual lenses and advanced algorithms. The results are astonishingly good compared to reflex cameras, where you achieve that result only by zooming completely in and focus on something close to you, the background gets blurred likewise. You can also achieve Bokeh-effects by using the manual mode of the camera by changing the aperture to a low number, learn more about that in the advanced photography guide.
Bokeh-effect
5. The unusual stuff
If you go to the place where the crowd goes, you will only see what the crowd sees. Always look out for weird and unusual stuff, stop and get them into your cam. The unusual is what makes us curious.
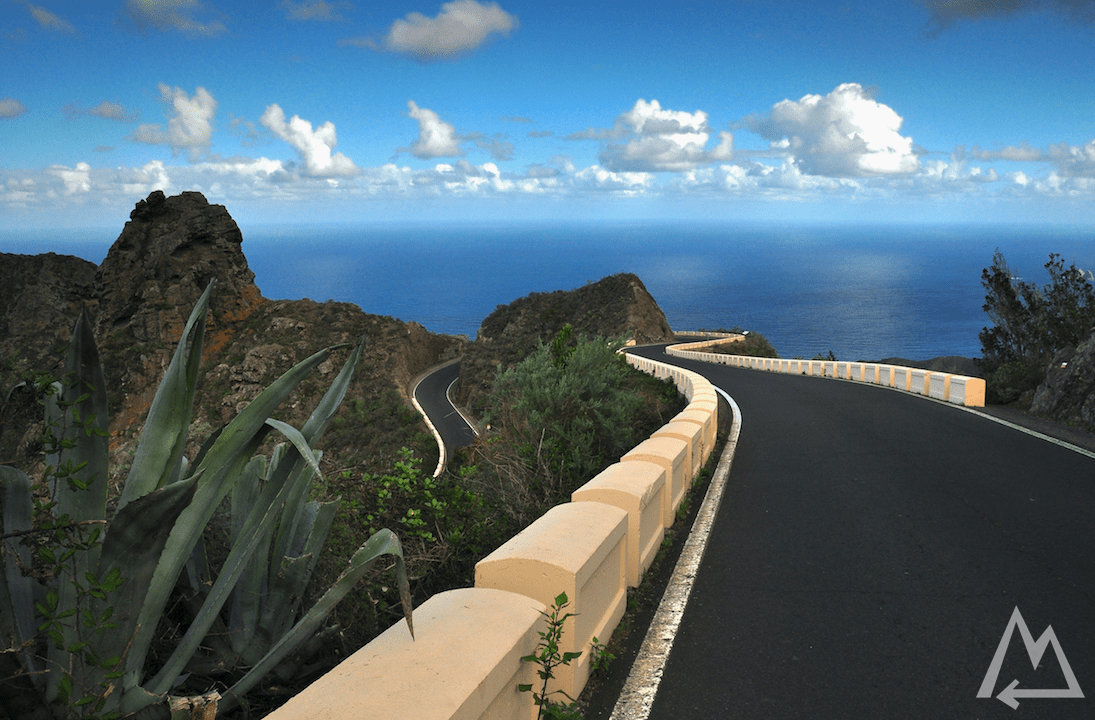
Unusual / outstanding stuff
Tip: If you’re at a famous place with the crowd, get out of it and try a different perspective / composition, this will turn a standard shot into a unique one.
6. After effects
Give your shots the final touch with some software tweaks. In 99% of the cases a free software or even pre-installed tools are more than enough. If you have a Mac just use the pre-installed app Apple Preview to adjust white balance, color intensity and contrast. If you use Windows try Windows Photos. Both apps have more or less the same functionalities, with Apple Preview you get slightly better results though.
Preview (Apple)
Open Preview → Tools → Adjust Color…
- Hit the Auto Levels button
- Adjust the Highlights slider to the right
- Fine tune Saturation (and Contrast)
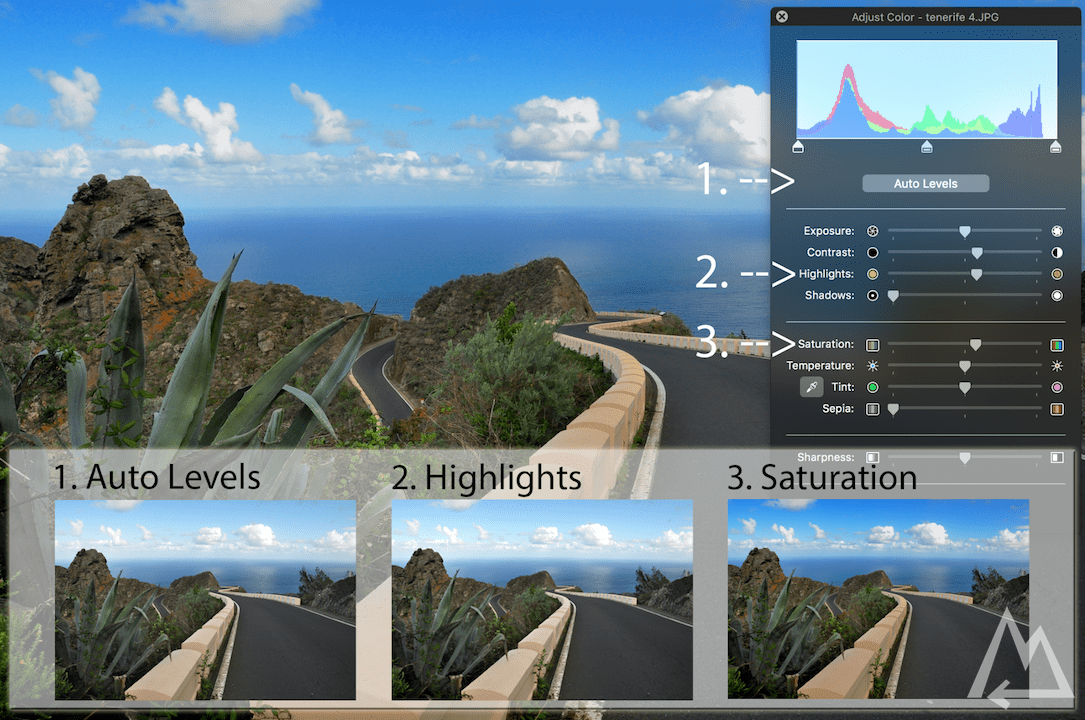
Fine tune your shots with Apple Preview
Auto Levels will correct underexposed shots and make them crystal clear. Use the Highlights slider to get rid of any reflections and increase the color richness (e.g. sky more blueish). Finally, use the Saturation and Contrast sliders to give your shot the epic magazine touch. Be careful not to overact and create carton images.
Photos (Windows 10)
Open Photos → Edit & Create → Edit (or just hit Ctrl + E) → Adjust
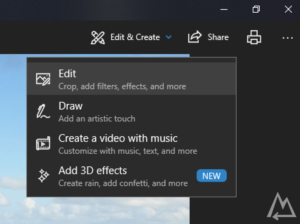
Windows Photos: get edit mode
- Adjust the Light with the slider to the left
- Adjust the Color with the slider to the right
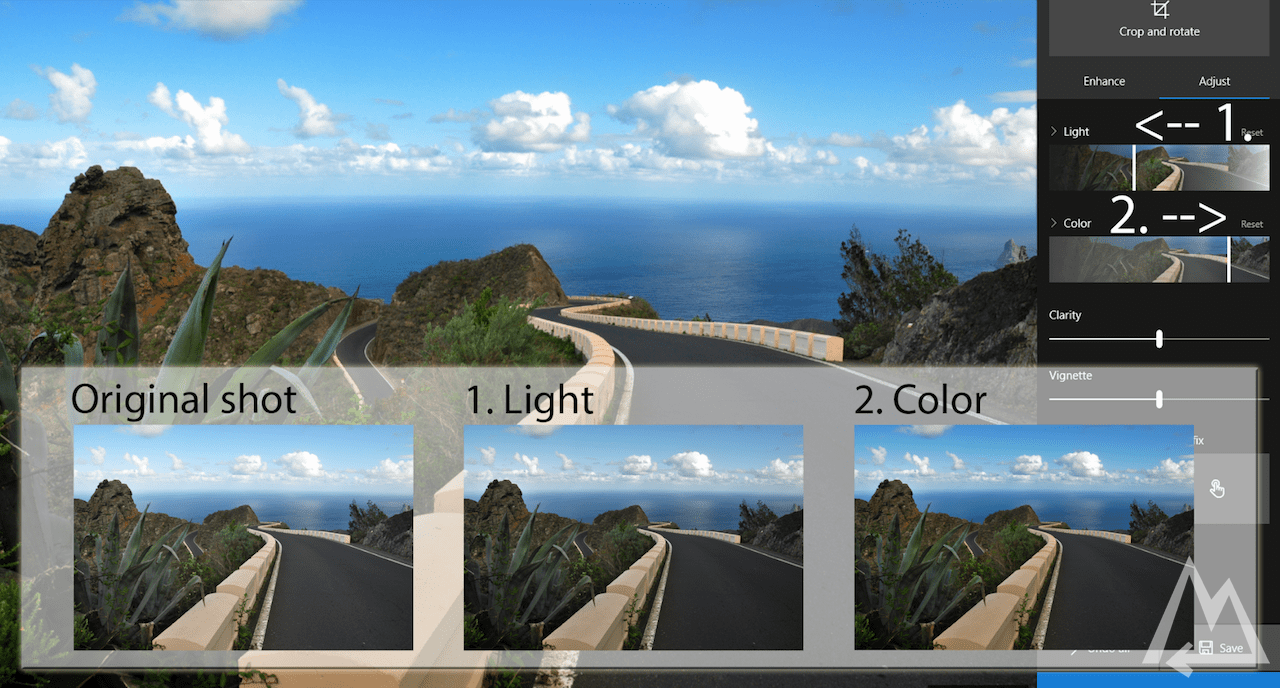
Finetune your shots with Windows Photos
Just slide the Light slider to the left and the Color slider to the right. If you want more control click the arrow left to the title and a dropdown menu offers more options.
Check out the advanced photography course to learn more about your camera’s manual mode, filters and other useful gadgets you need to master your shots on your next trip.
I hope this course was helpful. Feel free to comment if you miss anything.
Click here and sign up to get our new eBook for free.

We hope this post is helpful and inspiring.
Please let us know if anything is missing or misleading.